Gifts are wonderful to give as well as receive. Crafty girls know it's all about the presentation. From fancy boutique wrapping paper to extravagant bows and ribbons, we know it's worth it and makes giving worthwhile. But what about the small and simple gifts that may not require wrapping? A gift tag is the perfect way to present your gift in a simple but craft way.
Gift tags come in variety of styles. One new style I love is the hand-stitched gift tags. I'm not a stitching queen or anything but I do know how to thread a needle and stay within the lines. I like to craft a short and simple message on fabric or paper and use a little cross stitching to jazz up my gift tag. Here are two examples of a simple hand-stitched gift tag that adds a whole new meaning to gift-giving.

Supplies:
Greeting Stamp
Black ink pad
Black Permanent Marker (Optional)
White fabric
Stitching needle
Embroidery floss in colors of your choice
Scissors
3 inch wooden embroidery hoop
Iron
Twine

How to make a Hand-Stitched Gift Tag
Cut a small piece of fabric but enough to fit around the embroidery hoop. Use a black ink pad to stamp the greeting message on the fabric. If the ink is too light, use the permanent market to trace over to darken the design. Place the fabric over the inner wooden embroidery hoop. Tightly lay the outer hoop over the fabric and twist the screw to tighten.
Use a stitching needle with a large eye to thread the embroidery floss. Tie a knot at the end of the floss. Start by piercing the needle from under the hoop. Stitch only the obvious areas. Stay within the lines and keep the floss direction consistent. When you are done filling in the space with the stitching, tie a knot in the back of the hoop. Snip off the remaining floss. Keep the gift tag simple. The idea is to add a hint of stitching not the entire gift tag.
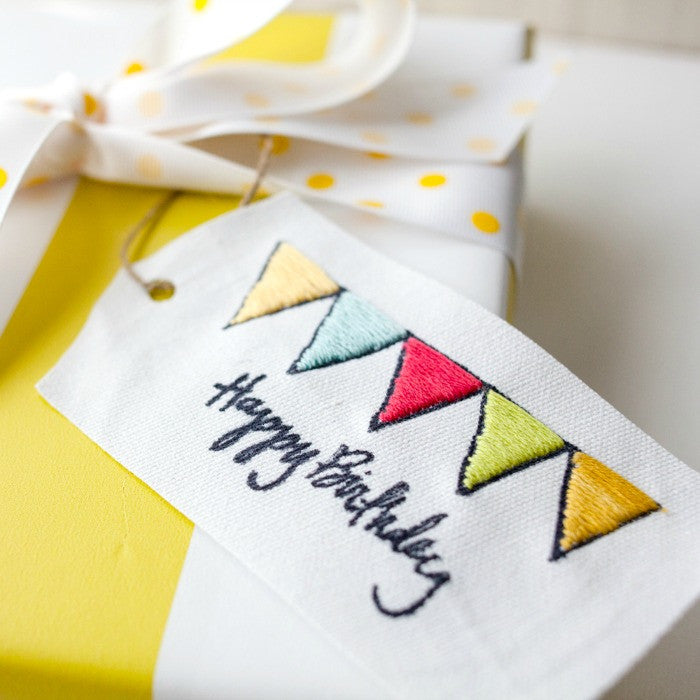
When done stitching, take off the embroidery hoop. Iron the fabric flat. Use scissors to cut the desired shape of the gift tag. Tie the gift tag with twine to a gift that does not need to be wrapped like the "Thank You" Succulent pot below.

For gifts that are wrapped, use the gift tag as an embellishment like this wrapped box below.

If the examples above are too complicated then start with stitching only the border of a gift tag on cardstock. Either way, you are adding creativity and style to your gift tags while practicing your stitching moves. After a few DIY gift tags, you will feel more comfortable and may challenge yourself to pull out those embroidery hoops after all. *wink*
For more fun and easy DIY projects and recipes, visit Sweets By Chan today. Follow me on Instagram and Facebook at @sweetsbychan.
Enjoy!
Chan