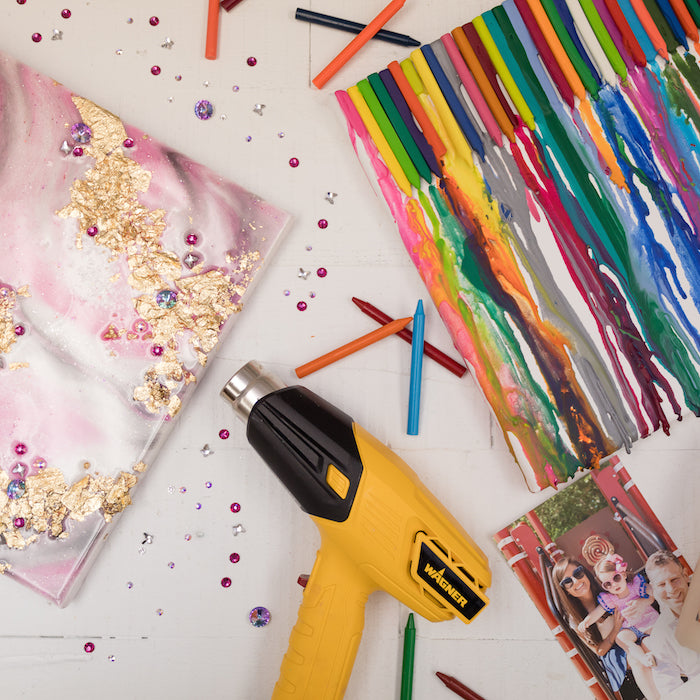
As a crafter, there is a handful of tools that I use on a regular basis and would recommend that every crafter should have! One of those tools is a heat gun. I have used the Wagner Furno 300 for years in more projects and I can count. I'm excited to partner with Wagner Spray Tech to share creative projects using the Wagner Furner 300 Heat Gun. I have gotten many questions about the difference between a blow dryer and a heat gun. There are very few occasions that you could use a blow dryer instead of a heat gun and get the same results. The major difference between a blow dryer and a heat gun is the high temperature the heat gun can reach. A blow dryer typically only heats to 140 degrees (great for blow-drying hair) and a heat gun can heat up to over 1000 degrees. The Wagner Furner 300 has two heat settings, 750 degrees, and 1100 degrees. For most craft and do it yourself projects higher heat and less air blowing is ideal making the heat gun a perfect solution. Because the Wagner Furno 300 is so versatile I created three very different projects to show you how easy it is to use! First I created an epoxy canvas and used the heat gun to remove air bubbles, then I used the heat gun to transfer a photo on to a candle and third I shared how easy it is to melt crayons for an art project. Get a quick preview with the video below and keep scrolling for the full step by step how-to is below!

Epoxy Canvas Pour
Supplies:
- Wagner Furno 300 Heat Gun
- Canvas
- Crystals/Gems
- Acrylic Paint (3 colors)
- Glitter
- Gold Flake
- Butcher Paper
- Epoxy
- Clear Cups
- Gloves
- Popsicle Sticks
- Cardboard Paper Rolls (to use as risers)

Directions:
- Before you begin, place the butcher paper (or another protective layer) onto your work surface.
- Arrange cardboard paper rolls in a square formation and place the canvas on top to raise the project.
- Always read the safety instructions on all products you are using as well as the Wagner Furno 300 Heat Gun.
- Wear gloves and apron for this portion of the craft.
- Pour a small amount of paint into three cups. Have a fourth cup empty.
- Prepare the epoxy per the package instructions and pour equal amounts of the mixed epoxy into the 3 acrylic paint color cups, then pour the fourth cup of clear epoxy resin only.
- Use the popsicle sticks to mix the paint and epoxy together. If you want a richer pigment add more paint to the cup.

- Add glitter to the fourth cup and mix with a popsicle stick.
- Once the 4 cups of resin are properly mixed, you are ready to start pouring them onto the canvas. Slowly pour each cup, alternating the colors. Pour enough to cover the majority of the canvas.
- Next, place hands under the canvas slightly tilt in each direction moving the epoxy around, creating a marbled effect.
- Place canvas back down onto the risers and allow the epoxy to drip off the sides. After a few minutes when the dripping has stopped, return to scrape residual hanging epoxy off the edges with a popsicle stick. Keep an eye on the edges and wipe periodically over the next 60 minutes.
- Next, add gold flake and gem/crystals to the canvas while the epoxy is still wet. Use a tweezer or lightly place each flake and/or gem onto the surface of the epoxy.

- The final step is to use the Wagner Heat Gun to eliminate bubbles. Lightly glide the heat gun above the surface of the epoxy to pop the air bubbles. Do this every 15 minutes for the next 60 minutes.

- Allow your project to cure overnight or as stated in the instructions before hanging/styling. Note that areas with more humidity will take longer to cure.


Candle Photo Transfer
Supplies:
- Wagner Furno 300 Heat Gun
- Candle
- Tissue Paper
- Parchment Paper
- Inkjet Color Printer

Directions:
- Select a photo that you would like to add to your candle. Scan the photo or if it is already digital make sure to adjust the size of the photo to fit the size of the candle.
- Cut and tape a piece of tissue paper onto a sheet of copy paper. Make sure the tissue paper is larger than the photo.
- Next print the selected photo onto the tissued copy paper.

- Cut out the photo from the tissue paper.
- Place and align the photo onto the candle, once aligned place a sheet of parchment paper over the photo and candle.

- Turn the Wagner Furno 300 Heat Gun on and gently glide it over the photo until the candle begins to “sweat”.
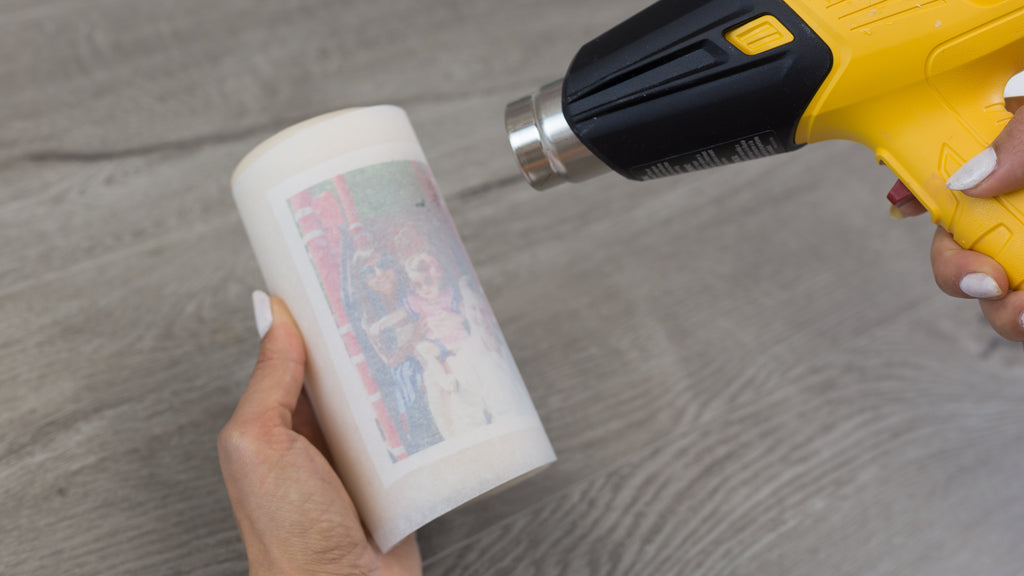

- Wait a few moments to cool, then peel the parchment paper to reveal your personalized photo candle!


Crayon Canvas Art
Supplies:
- Wagner Furno 300 Heat Gun
- Crayons (Various colors)
- Canvas
- Industrial Glue

Directions:
- Select enough crayons to line the top of the canvas.
- Remove the wrappers from the crayons.
- Next, organize and glue the crayons side-by-side pointing downward onto the top portion of the canvas.

- After the glue has dried, prop up your canvas and use your Wagner Furno 300 Heat Gun to slowly melt the crayons, allowing the colors to drip and run down the rest of the canvas.

- Continue until you are satisfied with your work of art. Make sure the wax is fully dry and cooled before handling it!


The possibilities are endless with the Wagner Furno 300 Heat Gun! Wagner makes a variety of heat guns to fit all your do it yourself projects! Visit Wagner's website to check out all the heat guns!
See more creative projects using the Wagner Sprayers: Website | Facebook | Twitter | Instagram | Youtube | Pinterest
xoxo- LL
This is a sponsored post with Wagner SprayTech but all project ideas, images and opinions are my own!