Thanksgiving is just a few weeks a way and I am helping the whole family get in on the fun with creative crafts. This week on my Crayola Facebook Live Broadcast, I am teaching the kiddos how to create a harvest owl scene and play pies with paper plates. I have an art craft for the older kiddos and adults that can be used in so many different ways!

You can find all the Crayola products I used today on Crayola.com
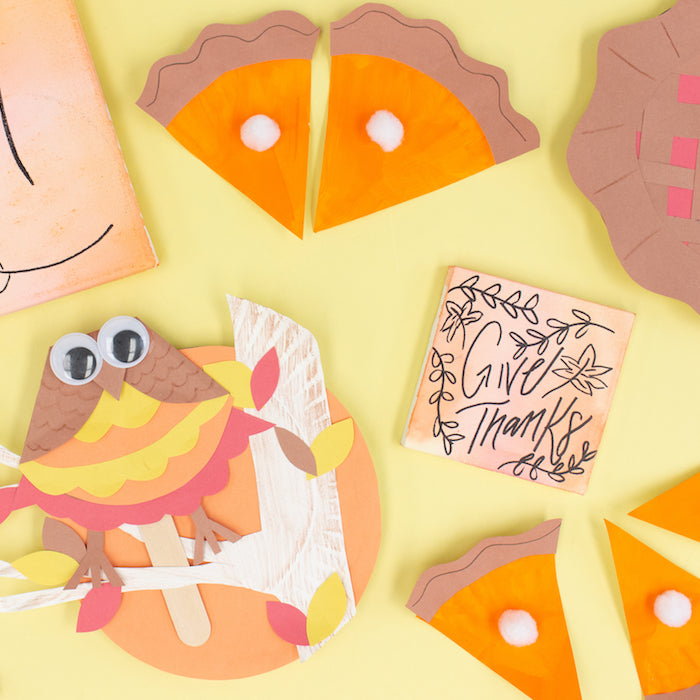
Project 1: Paper Plate Pies

Materials for Pumpkin Pie:
- Paper Plate
- Crayola Orange Acrylic Paint
- Crayola Brown Construction Paper
- White Pom Poms
- Crayola Washable Liquid Glue
- Scissor
- Pencil
- Ruler
Directions:
- Paint the paper plate orange and let it dry.
- Once the paper plate is dry, cut the pie into slices. You can use your ruler and pencil to make even slices.
- Next cut crust out of brown construction paper and glue to the edge of each plate slice.
- Glue one white pom pom in the center of each slice of pie.
Materials for Cherry Pie:
- Paper Plate
- Crayola Brown and Red Construction Paper
- Crayola Brown Crayon
- Crayola Washable Liquid Glue
- Scissor
- Pencil Ruler
Directions:
- Trace the paper plate on brown construction paper. Draw a curvy line around the outside of the circle. This will be the pie crust. Cut it out. Cut out the center of the crust.
- Trace the paper plate on a piece of red construction paper and cut out. This is the pie filling.
- Cut strips of brown paper the length of the circle. The strips should be about 1/2" wide.
- Lay the strips vertically across the circle. Weave in the remaining strips horizontally. Make sure to leave space between each so you can see the filling through the pie lattice. Glue into place once you are happy with the weave.
- Trim the excess strips around the edge of the circle.
- Glue the filling to the paper plate.
- Glue the crust on top of the filling.
Two fun pies. These are fun crafts your kids could make while you are cooking dinner!

Project 2: Harvest Owl in a Tree
Materials:
- 2 Paper Plates (1 small plate and one large)
- Crayola Construction Paper in Brown, Yellow, Red, Orange
- Scissors
- Crayola Brown Crayon
- Washable Liquid Glue
- Googley Eyes
- Popsicle Stick
- Pencil

Directions:
- Trace the smaller plate on orange paper and brown paper. Cut both circles out.
- Glue the orange circle to the paper plate used to trace it.
- Take the brown circle and fold the edges in toward the center. There should be a pointed tip at the top. Fold that down to make the beak.
- Unfold and cut pieces of yellow, orange and red paper to make feathers. Glue to the belly of the owl.
- Re-fold the wings and beak from step 3-4 and glue into place.
- Glue googley eyes above the beak.
- Cut out bird feet/claws and glue to the bottom of the owl.
- Glue the popsicle stick to the back of the owl.
- Take the second paper plate and draw a tree on the plate and cut out.
- Color the tree with a brown crayon.
- Glue the main part of the tree to the paper plate and circle from step 2. Do not glue the branches.
- Cut leaves from yellow, orange and red construction paper. Glue them around the tree.
Have fun using the owl as a puppet in the tree!

Project 3: Marker and Rubbing Alcohol Art
*This project is meant for adults or if created with kids, adults should manage the part of the craft using rubbing alcohol.
Materials:
- Canvas
- Crayola Super Tip Markers
- Rubbing Alcohol
- Spray Bottle
- Crayola Take Note Markers

Directions:
- To create a free flowing design for Thanksgiving. Using the Super Tip Markers to draw a design. It can be shapes or leaves. Make sure to fill them in. Be conscious of the colors you used because the ones next to each other will blend.
- Once the entire canvas is done have an adult fill a spray bottle with rubbing alcohol. Make sure the surface around the canvas is covered.
- The adult should spray the canvas with rubbing alcohol. Start with a few spray and watch the colors start to blend. The more you spray the more it will blend. You can also tilt the canvas to let the colors run together.
- Let the canvas completely dry. Once it is dry you can use a Crayola Take Note Permanent Marker in Black to write or draw a message.
I created a second set of designs that I am going to use at my daughter's birthday party this weekend. For this one, I selected a set of rainbow colors and colored about 2" wide and 3" long of each color right next to each other across the side of the canvas. Holding the canvas upright I sprayed the rubbing alcohol across the top where I colored and let the colors drip down. If you want the colors to drip more, keep spraying. Keep the canvas upright until it is dry.

Hopefully these projects will keep the whole family entertained this holiday season!
Happy Crafting!
LL