Crafting is like witnessing magic as it happens. One craft project I loved as a kid is magically turning plain Popsicle sticks into wearable jewelry. This craft project is so fun because kids get to creatively express themselves with basic art supplies they can wear! The project can take up to two days to transform ordinary Popsicle sticks into bracelets. That is just the first part of the magic. The second step is to personally decorate fashionable bracelets with colorful paint, water, glue and embellishments.

Turn Popsicle Sticks into a Bracelet (Adult Supervision Required)
Supplies:
A tall glass
Boiling hot water
Variety of Popsicle sticks
Direction:
- Soak the Popsicle stick in boiling hot water for 30 minutes. Make sure all of the Popsicle sticks are submerged in the hot water. Turn the sticks around after 15 minutes if your glass is not tall enough to submerge all of the sticks.
- Carefully bend the wet Popsicle sticks in a C-shape and fit it in the glass to hold in place. Change the old water and replace with hot water. Let it soak for 2-3 hours.
- Drain the water and let the Popsicle sticks dry in the glass. As the Popsicle sticks dry, it will hold the bracelet shape. Leave in a cool and dry place over night.
- Once the Popsicle sticks are completely dry and holds the bracelet shape, it’s time to decorate the bracelets.

Here are 6 ways to decorate your Popsicle stick bracelets:
Supplies:
Acrylic paints
tape
Paint brushes
Nail polish
Hot glue
Rhinestones
Embroidery floss
Black marker
Scissors
Gold leaf kit
Temporary metallic gold tattoo
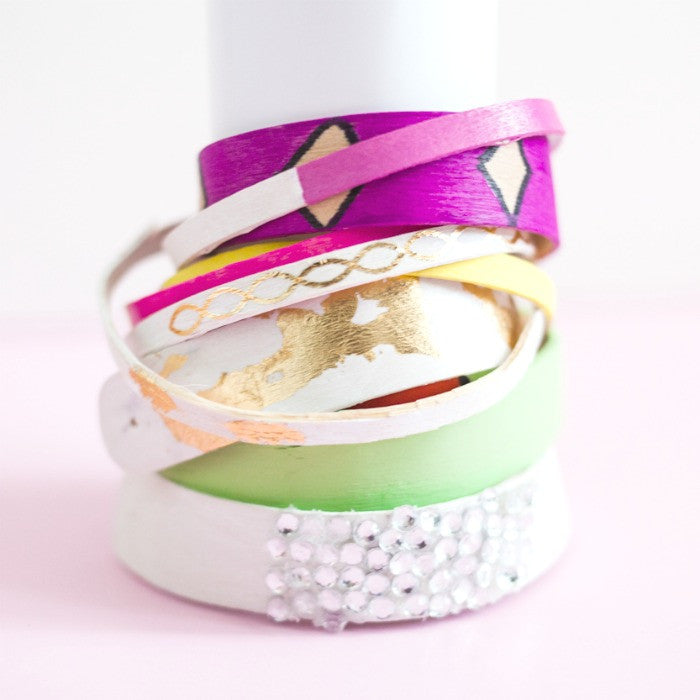
1. Paint with glossy nail polish. Use tape to outline your stopping point. Paint a thin Popsicle stick in multiple color blocks. Have at least one solid color bracelet. Pick a color that goes well with most of your outfits.

2. Draw Azteca designs using a permanent marker. Draw diamonds or squares and paint the Popsicle sticks with a bright color.

3. Use metallic tattoo art. Cut the temporary tattoo art and place it over the Popsicle stick. Apply water and press the tattoo into the wooden stick. Remove tattoo paper and you have instant tattoos!

4. Apply gold leafing to a white painted bracelet. This adds style and creativity. Follow instructions on how to use a Gold Leaf kit.

5. Add bling. Every bracelet needs bling. Use hot glue with the help of an adult and glue rhinestones on the wide or then Popsicle stick bracelet.

6. Draw modern designs with vibrant colors. Use curves and shapes to show off your artistic skills. Paint in the shapes.

After each bracelet is decorated, drill a hole on the ends of the larger Popsicle sticks. Loop an embroidery floss through the hole to make a bracelet tie. Tie this on to wrists that are too small to keep the bracelet on. Match with outfit for each bracelet set. Mix and match of a fun and creative look.
For more awesome recipes and crafts, visit my blog at The Crafting Board. Follow me on Instagram,Facebook, Twitter and YouTube too!
Enjoy!
Chan