I am thrilled to team up with Krylon Spray Paint to spruce up my home decor. Throughout the year I will be sharing my favorite colorful indoor and outdoor do it yourself projects made easy with my favorite Krylon products. I promise they will be simple, creative, useful and fun to make! This month Chan and I decided to take an old bookshelf that has been sitting in my basement and upcycle it into a functional desk and bookshelf in one! The current bookshelf was black but that did not match the bright vibrant colors in our office so we decided to give it a complete overhaul with 5 different colors of Krylon CoverMaxx including an amazing gold metallic! We even threw in an ombre twist for fun! Check this out.....
Before Picture:

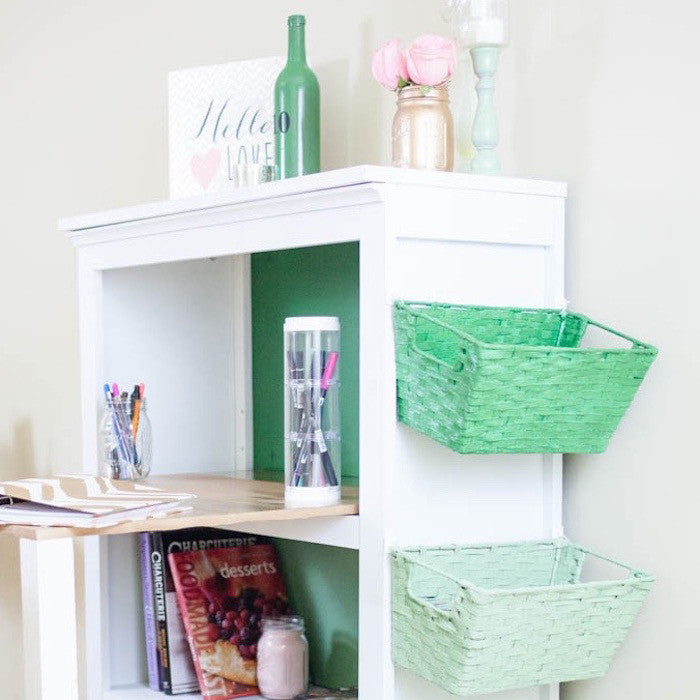
Final Product:

Check out the simple step by step instructions to complete this project.
Materials:
- Old Bookshelf
- Screw driver
- Iron On Adhesive Wood Edging
- Painters Tape
- Gloves
- Screws
- Power Drill
- Razor
- Krylon COVERMAXX in Gold Metallic (2 cans), Pistachio Satin (2 cans), Seaside Green Matte (2 cans), Seaweed Gloss (2 cans), White Matte (6 cans)
- Craft Paper or a Drop Cloth
- A piece of plywood cut to fit your self. I used a 25 inch x 30 inch piece. I had the hardware store cut it to size for me.
- 2 table legs measured to fit your ideal height for your desk. Measure the distance from the shelf that your plywood desk top will sit on to the floor. Hardware stores like Lowes and Home Depot sell standard table lets and decorate legs that you can have cut to your required length.
- 3 baskets and 6 adhesive wall hooks

Directions:
- Cover a large flat surface outdoors or in a well ventilated room to protect from overspray.
- Using a piece of chalk or chalk pen mark the back wall of the shelf by drawing a straight line to determine where you would like the shelves to be. This will be used to create the ombre color scheme.

- Remove the shelves and backing from your shelf and lay flat on the covered surface. Lay the shelf on the flat surface.
- Wipe down all the surfaces to make sure they are dust and dirt free.
- Start by applying single coats of Krylon COVERMAXX White to shelf, shelves and table legs. Don't forget to read the product label for proper application and safety instructions!
-
Repeat every 10 minutes until you get your desired coverage. We used 3 coats.

- Apply painters tape to the back of the shelf on the chalk lines. Each section needs to be sprayed individually. Cover the other two sections with craft paper when spraying each section. To create an ombre effect start with darkest paint at the top and apply from darkest to lightest. We used 2 coats for each section.
- Plug in your iron and heat it on the cotton setting. Measure and cut enough of the wood edging to cover all four sides of the plywood table top.
- Place the adhesive side of the wood edging on the edge of the plywood. Run the iron over the edge until the edging adheres. It helps to have one person holding the board and the other ironing.

- Trim the excess edging using an razor. Be careful!

- Apply a single coat of Krylon cover Maxx Gold Metallic to the table top. Repeat every 10 minutes until you get your desired coverage. We used 2 coats.
- Place each basket face down on the covered surface about 2 feet apart. Spray one coat on each basket, one basket with the Seaweed, one with the Seaside Green, one with the Pistachio. Repeat coats every 10 minutes.
- Once you have the desired colors on the baskets flip them over and repeat step 11 for the interior of the basket.
- Once you have achieved desired coverage on all pieces let them dry for at least 2 hours before assembly.
- When you are ready to assemble, place the shelves back in the bookshelf before screwing the shelf backing back on.
- Using your power drill and screws, screw the table top into the top of the table legs. You will definitely need a helper to get this step done.
- Place the tabletop on the shelf to create the desk. For extra support, screw the table top to the shelf.
- Add the baskets to the side of the shelf. Hang them using adhesive wall hooks.


Take a look at the final product!


We upycled a few of household items by spray painting them with the extra paint to create matching decor! Check out the wine bottles, candle sticks and mason jar!

Check out Krylon's website to find a local retailer near you.
Connect with Krylon: Website | Facebook | YouTube | Pinterest | Twitter
xoxo- LL & Chan
This post is part of sponsored campaign with Krylon Spray Paint. All ideas and opinions are our own.

Awesome! I love the ombre effect on the baskets. I need to redo my craft room and this is some nice inspiration.