


This is a sponsored conversation written by me on behalf of Cricut. The opinions and text are all mine.
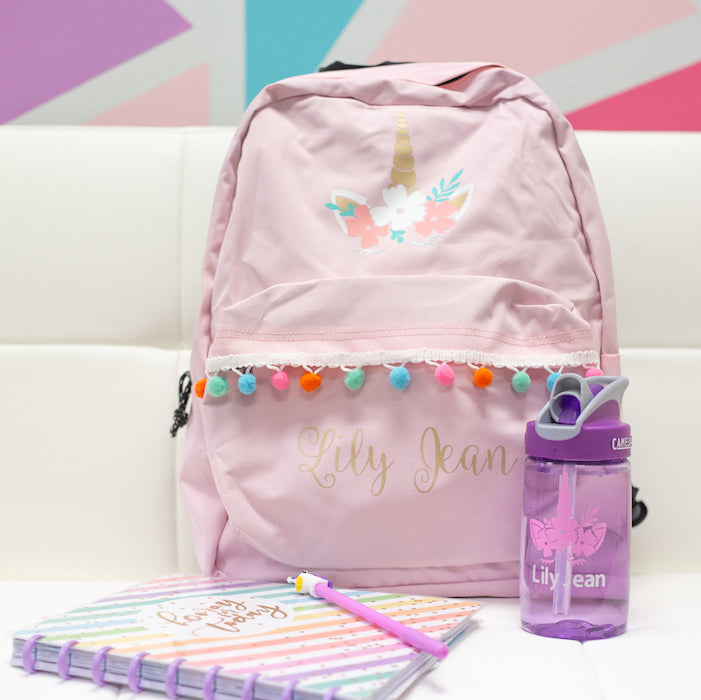
Back to school is just weeks away and as the kiddos gear up for back to school you can make it a little extra fun by customizing their school essentials. My daughter Lily is a little to young for pre-school but we are starting to look at pre-schools and day camps. Just like school, she needs a backpack and water bottle to take with her. I have quickly learned that kids mix things up, lose them and even trade them so adding their name and fun matching design is an easy way to keep track of your kiddo's essentials.
My go-to tool for personalizing and creating easy projects is my Cricut Maker. I have posted a lot lately about the Cricut Maker and all the amazing capabilities of this ultimate smart cutting machine. It is the most powerful cutting machine in the Cricut line-up with the capability of cutting paper, vinyl, fabric, wood, leather and more. With a new adaptable tool system, it can now etch glass, deboss, score and so much more! I will be sharing how all of these new tools work in the coming weeks.
For back to school I wanted to create a matching backpack and water bottle with Lily's name and the same design across both so they would have the best chance of not getting lost!

Here is what you need for this project set:

- Unicorn Backpack
- Cricut Maker
- Cricut Easy Press 2
- Easy Press Mat
- Standard Cutting Mat
- Everyday Iron-On Coastal Sampler
- Backpack
- Pom Pom Trim and Glue
- Cricut Weeding Tool
- Cricut Scissor
- Unicorn Water Bottle
- Cricut Maker
- Standard Cutting Mat
- Standard Grip Transfer Tape
- Premium Shimmer Permanent Vinyl / Cotton Candy Pack
- Cricut Scraper
- Cricut Weeding Tool
- Cricut Scissor
Directions for Unicorn Backpack:
- Open Cricut Design Space and create a new project.
- Select Images and Search Unicorn Horn for the largest assortment of unicorns. I wanted to pick a design that was easily translated from iron-on to adhesive vinyl. I selected the Spring Flowers Unicorn (#MA3A9D68) but there are so many options.

- Once the design was on the canvas I added my daughter's name in ballerina font.

- Keep in mind the unicorn design is color-coded and each part will be separated into a new cutting mat. You can adjust those colors if you want to cut on the same mat.
- Make sure measure the backpack so you can adjust the design size before you move to cut it.
- Once ready hit make it and follow the steps including mirroring your design and selecting "iron-on" as the material.

- Once all pieces of the design are cut, weed the design and decide on the positioning.
- I always use the EasyPress settings guide when working with any heat transfer materials. The team at Cricut has tested every material and setting to create a fail-proof guide!
- On the guide, I input that was I using an EasyPress 2, EasyPress Mat, Everyday Iron-On and my base material was polyester. I placed the EasyPress mat inside the backpack. The guide directed me to pre-heat the backpack for 5 seconds on 315 degrees. Once pre-heated I placed my design and pressed it for 30 seconds on 315 degrees. I peeled the backing while it was still warm.


- For added fun, I glued pom pom trim across the bottom pouch.

Directions for the Water Bottle:
- Go back into design space and refer to the design created for the backpack. I adjusted the unicorn by making all the components the same color. I also changed the font and resized it to fit the water bottle dimensions. Once the design was complete I selected all components and attached them (icon in the bottom right corner) and then welded them together (icon next to attach icon.

- Once the design is ready to follow the prompts to cut including selecting the appropriate material. Do not mirror the design.
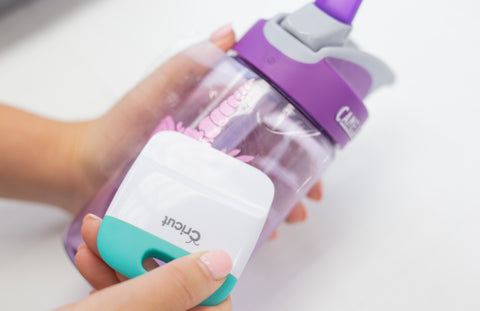
- Once cut, use the weeding tool to remove the excess vinyl.
- Next, cut a piece of transfer tape to cover the entire design. Remove the backing and stick to the design. Use the scraper to rub over the design with pressure until it adheres to the tape.

- Place the design on the transfer tape on the water bottle. Stick and rub over the design with the scraper until it adheres to water bottle. Remove the tape to reveal the final design!

TADA!!!!!!!

TADA!!! You know have a matching unicorn backpack and water bottle. Lily came to the studio to model the backpack and water bottle!


Share your Cricut back to school projects by tagging @officalcricut and using tag #cricutcreated
Happy Back to School!
xoxo- LL