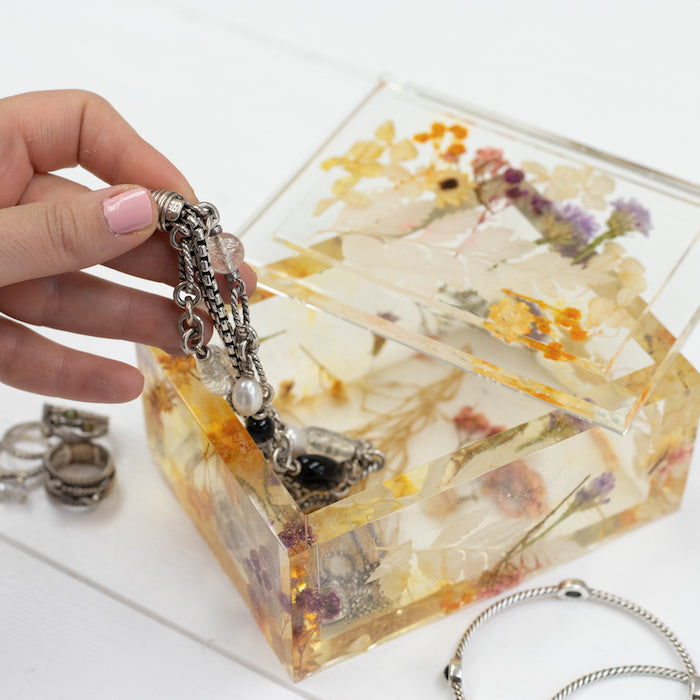
Pressed flowers epoxy resin crafts are all the rage right now. They made great home decor and gifts. After my pressed flower epoxy resin coasters were such a hit I decided to create a pressed flower epoxy resin jewelry box. I am partnering again with Aleene's because I love their new low odor Clear Casting and Coating Epoxy Resin. Check out how easy it was to make!

Materials:
- Aleene's Clear Casting & Coating Epoxy Resin
- Silicon Jewelry Box Mold
- Pressed Flowers (I got a multipack that will last for a bunch of projects)
- Plastic Cups
- Stir Sticks
- Tweezers
- Safety Gear (gloves, mask, eye protector)
- Heat Gun

Directions:
- Before getting started, completely read the instructions and safety precautions for the Aleene's Clear Casting and Coating Epoxy Resin.
- Put on gloves, safety mask and glasses. Make sure to cover your work surface. Work on a flat area where your project can stay and cure for at least 24 hours.
- The epoxy resin is a 1:1 mixing ratio but you MUST follow the instructions carefully when mixing to ensure you get the optional end product. Once you start mixing you have a 25 minute work time.
- Pour 1 part resin in one cup, 1 part hardener in a second cup, ensuring it is equal amounts of each.

- Pour both the resin and hardener in one cup, scraping the edges of each cup with a craft stick.
- Use a craft stick to mix for 3-5 minutes until all the streaks have disappeared. Once you do not see any more streaks, mix for 2 minutes.

- Pour the mixture into a clean cup, scraping the edges of the cup.
- Mix for an additional 1 minute.
- Pour a small amount of the mix into the silicone top of the jewelry box mold.
- To avoid bubbles dip the pressed flowers into the epoxy resin and coat them before laying them in the mold.
- Create your design and finish with a layer of epoxy resin. If the flowers move when you pour, use the tweezer to reposition them.

- Next pour a small amount of epoxy resin in one corner of the jewelry box mold and let it flow around the bottom of the mold.
- Dip flowers in resin before adding them to the mold. I left the wood form that came with the mold off so that I could see where I was placing the flowers. Use your tweezers to move the flowers around.
- Fill the mold a little bit at a time as you add flowers. Don't forget to add them to the top. Fill the mold to the top with epoxy.

- Slightly tap the box portion of the mold on the table to get the air bubbles to rise to the top.
- Slightly glide a heat gun over the surfaces of the epoxy resin to eliminate air bubbles.
- Slide the wood form around the bottom of the box so the silicon mold keeps the proper shape.
- Let the epoxy resin cure in the molds for 24-48 hours.
- Once completely cured, remove from the molds to reveal the final project!

I am so excited about the outcome of this project! The Aleene's Clear Casting and  Coating Epoxy Resin worked perfectly! I am already dreaming up my next epoxy resin project!
Happy Crafting
-Lynn
