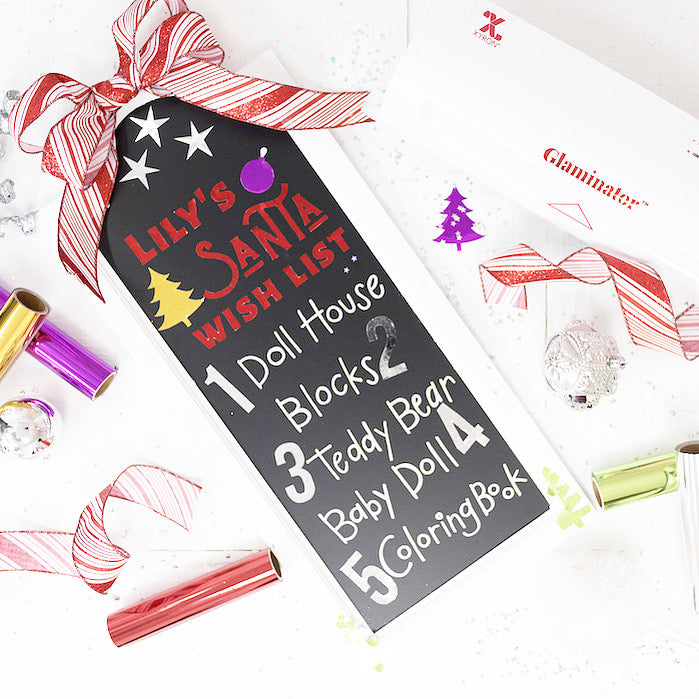
Glamour is shine and confidence! I never thought a craft project could be so glamorous until I met the Glaminator! The Glaminator is the newest tool from Xyron to make your projects shine and add the perfect touch of glam! The Glaminator is for foiling and also works as a hot and cold laminator! You can add foil accents to your projects in minutes!! To celebrate the launch the team at Xyron is partnering with 12 creators for 12 Days of Glaminator Giveaways! I am so excited to kick off Day 1 of 12 Days of Glaminator Giveaways with a Santa's Wishlist Chalkboard for my daughter Lily!
I wanted to go all-in on the glam for this project so instead of just adding accents I decided to create all stand-alone foiled letters and accents. It was a little more tedious with cutting but so worth it!
My friends at Xyron want you to get your glam on this holiday season so they are offering 35% of the Glaminator and Glaminator supplies, plus free 3-day shipping sitewide using the code CBGGLAM! The code will be live through Dec. 16th!
Materials:
- Xyron Glaminator
- Xyron Metallic Foil Transfer for Glaminator
- Xyron Color Foil Transfer for Glaminator
- Chalkboard
- Laser Ink Printer
- Ribbon
- Hot Glue Gun & Glue
- Scissors
- Holiday Ribbon
- Xyron Creative Station Lite

Directions:
- I designed the "Lily's Santa Wish List" graphics on Canva.com as well as the numbers, stars and tree accents. This is a free online design software.
- Once you have created the design, print on a laser ink printer. Make sure the printer is not set to draft or ink save mode. You must use a laser ink printer!
- Turn the Glaminator on by sliding the switch to the star symbol and wait for the green light to illuminate next to the checkmark.
- Cut around the letters leaving a boarder.
- Place each cutout inside the included carrier. Take a sheet of foil that is at least 1/4 inch wider than the printout. Make sure the shiny side is up. Close the carrier.


- Run the carrier through the Glaminator.

- Let the carrier sit until it is cool to the touch.
- Open the carrier cover, gently pull back foil and BOOM!!! It is glaminated (my new word)!!!


- Because I wanted my letters to be stand-alone I cut the excess white paper around the letters with a detail scissor.
- Repeat steps 4-9 for all the words, stars, numbers and trees!


- Next, run every piece through the Xyron Creativation Station Lite to turn it into a sticker. This is one of my other favorite tools!

- Remove the sticker backings and place them on the chalkboard.


- Create a bow with holiday ribbon and use hot glue to attach to the top of the chalkboard sign.


I am so excited to use this board every year to keep track of Lily's wishlist for Santa! Even though she can't read yet, she loves the board and got so excited when I put it out!
The possibilities are endless with the Glaminator. From creating holiday decor to adding foil accents to cards, handmade gifts, business cards and more! I have so many projects lined up that will have a little extra glam this holiday season!
Make sure you follow @xyroninc on Instagram for details on how you can enter to win during the 12 days of Glaminator Giveaways!
This post is sponsored by Xyron but all thoughts and opinions are my own!
xoxo- Lynn
I would like to use this wishlist chalkboard in my kitchen & for my kids room too… For my little projects too . It gonna b a super fun!!!