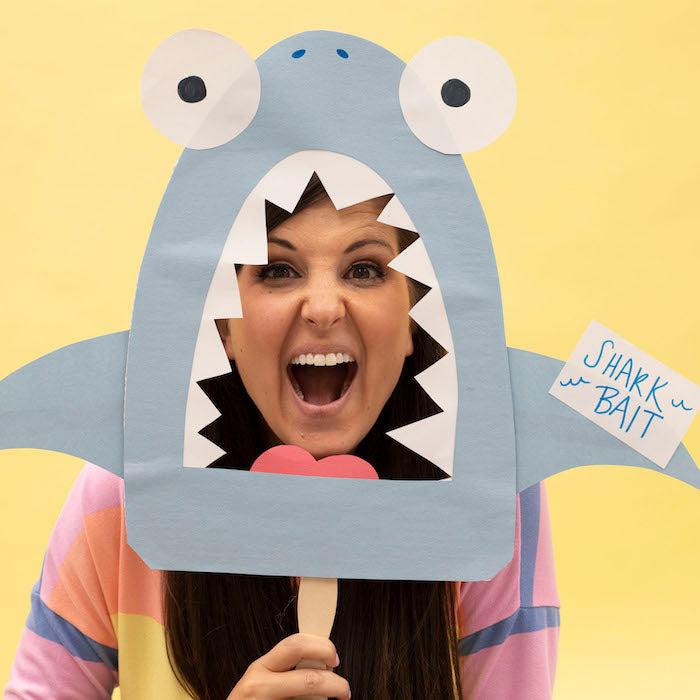
Shark week is HERE!! I am terrified of sharks but I love shark crafts. They can fun and playful and great way to bring the family together. Have fun as a family crafting and watching shark week. This week on my Crayola Facebook live we are making 3 shark crafts that will definitely be fun for everyone in the family!
All the Crayola supplies I am using today are available on Crayola.com.

Project 1: Craft Roll Shark
Materials:
- Cardboard Craft Roll
- Crayola Construction Paper
- Crayola Markers
- Crayola washable Liquid Glue
- Googley Eyes
- Scissors
- Stapler
Directions:
- Cut and glue blue construction paper around the craft roll.
- Use the scissor to cut out the mouth of the shark.
- Cut and glue shark teeth onto the inside of the opening of the mouth. Give your shark a tongue with red construction paper.
- Cut out shark fins for each side of the shark. Bend back the end of the fin and glue one fin to each side of the craft roll.
- Cut out a tail for the shark. Trace and cut a second tail.
- Staple the opposite end of the craft roll shut.
- Glue the tail pieces on each side of the stapled end.
- Cut out a triangle and fold the end back. Glue to the top of the shark for the top fin.
- Glue on googley eyes or draw eyes.
- Use the markers to add details like gills.

Have fun playing with your new shark pet!
Project 2: Shark Bite Photo Prop

Materials:
- Crayola Giant Construction Paper Sheets
- Crayola Markers
- Crayola Glue Stick
- Cardboard
- Pencil
- Large Popsicle Stick
- Scissors
- Craft Knife (adult use)
Directions:
- Draw and cut a large half egg shape on a piece of light blue, blue or black giant construction paper. You will want to fill most of the giant sheet. This is the top half of the shark.
- Inside the shark draw a smaller half egg. This is the mouth opening. You want it to be big enough so a head would fit in it for a photo. Cut out the inside.
- On the scrap cardboard trace the outside and inside of the shark.
- **Adult Step** Use the scissor to the cut out the outside of the shark. Use the craft knife to cut out the inside.
- Cut 2 shark fins from the same color of construction paper you used for the shark body.
- Glue the fins to the the back of the body so they are coming out for each side.
- Cut out two medium sized circles on white construction paper. Use a black marker to the draw the eye balls on the eyes. Glue these on each side of the tip of the shark nose.
- Draw and cut out teeth and a tongue for the inside of the mouth. Glue to the back of the shark mouth.
- Glue the shark to the cardboard cut out so it is sturdy.
- Glue a large popsicle stick to the back so you can hold up the shark for photos.
- You can also add a little sign to the sharks fin and write a fun message like "shark bait"

Project 3: Shark Salt Art Canvas

Materials:
- Crayola Watercolor & Brush
- Crayola Crayons
- Crayola Washable Glue
- Canvas
- Table Salt
Directions:
- Use the crayons to draw a shark and ocean scene.
- Pick elements of the drawing to add a 3D effect to. I picked ocean waves, splashes and the sun.
- Squeeze the liquid glue and trace the lines you selected.
- Sprinkle salt all over the areas you traced with glue. You want to make sure the glue is completely covered in salt.
- Shake off the excess of the trash can.
- Using the watercolor, wet each color palette with the brush. Fill the brush with color and light touch to the salt. Watch the color spread. Repeat over all the areas, switching up the colors as you go.

That was a big bite of crafting! I hope you have fun watching shark week and crafting as a family!
xoxo- Lynn


