Valentine's Day is almost here and if your child's school is like my daughters, they are requesting less candy favors for Valentine's Day Celebrations. Earlier this month I shared 3 ideas for Classroom Valentine's Day Card Boxes live on the Crayola FB page and now it is time to share ideas for non-candy Valentine's Day cards and favors.
All of the Crayola products used today can be found on crayola.com. Have you checked out some of the bulk products you can order. I took advantage of this for Lily's classroom favors.

Project 1: Kindness Crayons Favor
This is the favor I am doing for Lily's classroom this year. You can do this with any set of crayons but I thought the new Kindness crayons were perfect and they are new so I figured most kiddos didn't have them yet.
Materials:
- Crayola Crayons
- Crayola Bright Pop Cardstock Pad
- Crayola Construction Paper
- Crayola SuperTip or Fine Line Markers
- Crayola Glue Stick
- Scissors
- Ruller
- Template (open, save to computer and print for free)
- Pencil

Directions:
- Download and print out the template for the crayon box wrap. Cut it out and trace it on a piece fo Bright Pop Cardstock or construction paper. Lay the template over the piece you just cut and fold along the dashed lines.
- Wrap the template around the box of Crayons. The fold lines will line up with the corners of the box. Use a glue stick to secure the paper to the paper (don't get it on the box) snuggly around the box.
- Cut out two hearts, ones slightly larger and glue them on the wrap of the crayon box.
- Cut out the shape of a small crayon that will fit across the box. Color in the lines and write the name of your classmate. Glue to the bottom of the wrap below the hearts.
- Write a fun message in the large heart like "Color Your Heart Out" and don't forget to sign your name in the smaller heart.
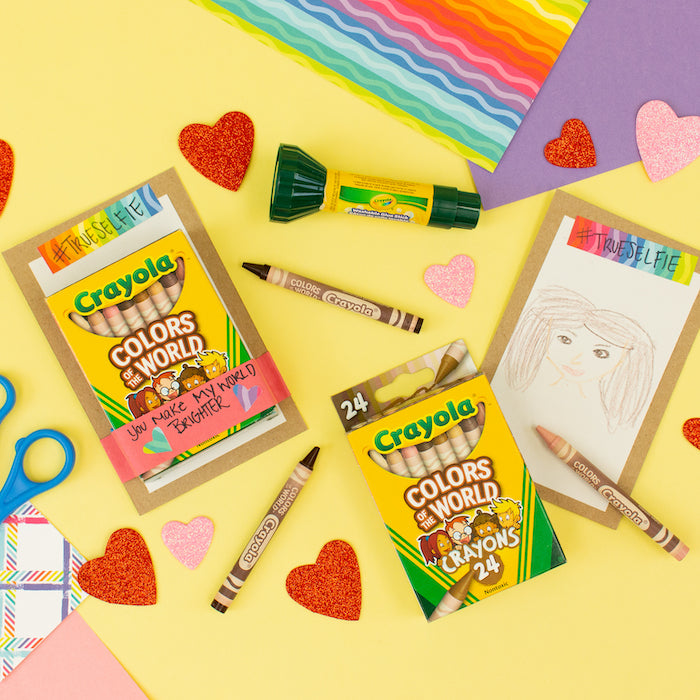
Project 2: #TrueSelfie Draw-It-Yourself Frame & Colors of the World Crayons
We love the Crayola Colors of the World Crayons and if I had not already sent in sets to my daughter's class earlier this year I would have totally have done this as her Valentine's Day favors.
Materials:
- Crayola Colors of the World Crayons
- Thin Cardboard
- Crayola Construction Paper and/or Bright Pop Cardstock
- Crayola SuperTips or Fine Line Markers
- Crayola Glue Stick
- Ruler
- Scissors
- Pencil
- Painters Tape

Directions:
- Cut a piece of thin cardboard slightly larger than the box of crayons. The cardboard from the back of a paper pad works well.
- Cut a piece of white construction paper slightly smaller than the cardboard. Glue it to the center of the cardboard to make a frame
- Cut a piece of construction paper or cardstock into a small strip about 1/4 the width of the short side of the cardboard. Glue towards the top of the frame.
- Use a marker to write #TrueSelfie
- Roll a small piece of painters tape and stick it to the back of the COW crayon box, fold back the top and stick to the center of the frame.
- Cut a strip of construction paper and wrap it around the box and frame. Use tape to secure it to the back of the frame.
- Write a fun message on the strip of the construction paper.
This is the perfect favor to promote and teach inclusion and self love! Don't forget to share your little artists #trueselfie on social.
Project 3: Model Magic Pencil Toppers Favors
Materials:
- Crayola Model Magic
- Crayola Pencils
- Crayola Bright Pop Cardstock or Construction Paper
- Scissors
- Crayola SuperTip Markers or Fine Line Markers
- Arrow Template (open, save to computer and print for free)
- Crayola Model Magic Cutter Tool

Directions.
- Pick two colors of the model magic. Roll or press out each color to about 1/4" thick. Use the heart cutter to stamp out a heart in each color.
- Place one heart on top of the other so the back one looks like it is peaking out.
- Roll a ball of Model Magic in any color and push on the top of the pencil eraser.
- Carefully push the hearts on to the ball to create the pencil topper.
- Let the Model Magic air dry.
- While it is drying, print, cut out and trace the arrow on to cardstock or construction paper. Cut out.
- Slightly fold the arrow in half long ways (hot dog style) and cut to small slits about 1/4" wide and 2-3" apart. Unfold.
- Once the Model Magic is dry use a marker to write a classmates name on the top heart.
- Slide the pencil through the slits on the arrow.
- Cut out a heart and write a message. Glue the heart to the arrow.
I hope these ideas inspired you and your kiddos! Stayed tuned for creative ideas for the kiddos!
Happy Crafting!
Lynn :)


