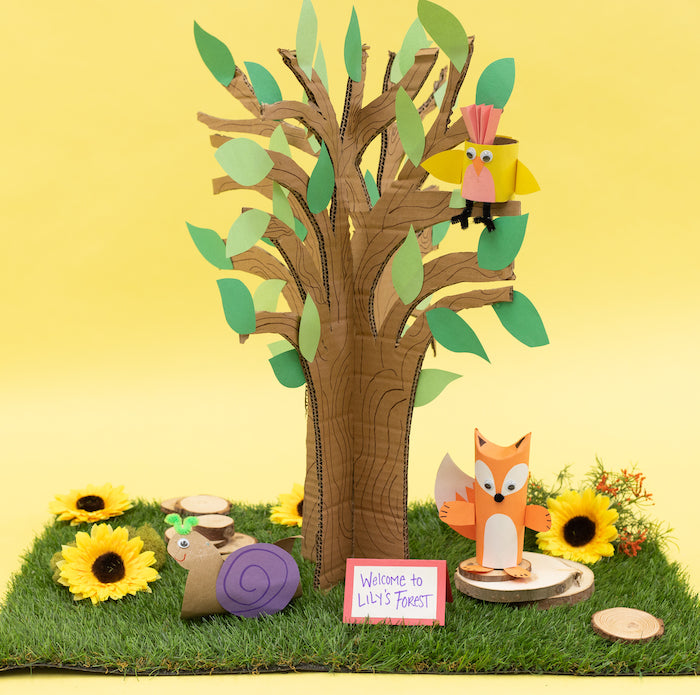
My house still looks like a holiday hurricane. We made it through Christmas and then it was Bella's first birthday. Toys, boxes and decorations are still everywhere. For this week's Crayola live Facebook broadcast I thought why not make the best of the mess and all the left over shipping boxes and turn them into a woodland place set that will bring joy through making it and hopefully hours of playtime (or at least 30 minutes).

All the Crayola products I am using today can be found at Crayola.com
Project: Cardboard Box Tree
Materials for the Tree:
- Scrap Cardboard (larger cardboard boxes works well)
- Crayola Construction Paper
- Crayola Washable Liquid Glue
- Crayola Super Tips
- Hot Glue or a Industrial Glue
- Craft Knife
- Scissors
- Pencil

Directions
- Draw a large outline of a tree on a piece of cardboard.
- Parents, use a sharp scissor or craft knife to cut out the tree.
- Draw a second tree on another piece of cardboard that is the same size.
- Parents, use a sharp scissor craft knife to cut out the tree.
- Take a brown marker and decorate both sides of both pieces of the trees.
- Parent's, take the first tree and cut a slit from the bottom center of the trunk. Stop a few inches before reaching the top. Do not cut all the way through.
- Parents, take the second tree and cut a slip from the top toward the bottom stopping a few inches before the bottom. Do not cut all the way through.
- Insert the second piece on to the first piece by sliding the slits into one another. Keep in mind you might need to cut a little deeper on either one to get them to line up.
- You might need to secure them with hot glue or industrial glue. Parents this part is a job for you.
- Time to dress the tree. Cut out leaves and glue them to the branches.
Project: Craft Roll Snail
Materials:
- Cardboard Craft Roll (approximately 5")
- Crayola Construction Paper
- Crayola Liquid Washable Glue
- Google Eye
- Green Pipe Cleaner
- Crayola Super Tips
- Scissors

Directions
- Starting at one end of the craft roll cut the roll into a spiral.
- At the end where you ended cutting, use the scissor to round it out and make a head shape.
- Glue a google eye on the snail head and draw a smile with a marker.
- Create antennas with a pipe cleaner and glue to the top of the snail head.
- Pick a color for the snail shell. Cut out a circle and use a marker to draw a spiral inside the circle.
- Glue the circle to the snail and TADA! It's time roll!
Project: Craft Roll Fox
Materials:
- Carboard Craft Roll (approximately 5")
- Crayola Construction Paper
- Crayola Glue Stick
- Googley Eyes
- Small Black Pom Pom
- Scissor
- Pencil

Directions:
- Cut a piece of orange construction paper that fits around the craft roll. Use the glue stick to glue the paper to the craft roll.
- Using your finger push in the front and back of the top of the craft roll so the side poke up. This will the fox ears.
- Draw triangles on the ears with a marker.
- Cut two tear drop shaped fur patches from white construction paper and glue on the top section of the fox (face) with the points angled down and touching.
- Glue the pom pom where the points of the tear drop meet.
- Glue a googley eye on each fur patch.
- Cut a half oval out of white for a belly fur patch. Glue at the bottom of the body.
- Cut out paws and glue to the sides and bottom.
- Lastly, cut out a tail and glue to the back so it is poking out the side.
Let your kiddos get creative and make more woodland animals to play with. I even added a small bird to the trees.

I hope this project brings your kiddos joy and sparks creativity!

For winter I will be live the second and fourth Tuesday of the month at 1:00pm on the Crayola Facebook Page. When school lets out I will return to weekly. Im exciting to keep crafting with you all year long!
Happy Crafting!
Lynn :)


