I am thrilled to be a Michaels Maker and continue to share my passions and projects with the Michaels community. This post is a collaboration with Michaels Stores.
As many of you know I have been working with Michaels for almost two years hosting a weekly facebook live show every Wednesday at 1:00 pm on the Michaels Stores Facebook Page, collaborating on content and my favorite experience was representing Michaels Stores on Good Morning America. I am so thankful to Michaels for believing in me and giving the opportunity to share my passion for creating with their community. I was so honored when they told me I was going to be featured in the Maker Spotlight! Check out their email newsletter and instagram stories for the feature! To celebrate I decided to pull out my Cricut Maker create a unique project!

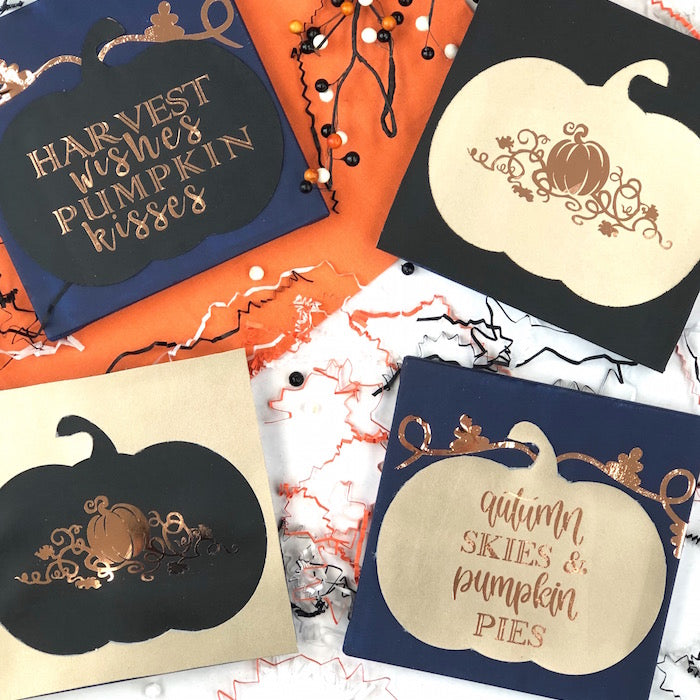
Fall is my favorite time of the year. I have created so many projects over the years that work great for Halloween or Autumn but never one that works great for both. I decided to challenge myself to create a project that not only worked for both seasons but also was a little outside the box. I have ironed vinyl and foil to traditional fabrics a million times but never to leather or stretched canvas. When Michaels reached out and said they wanted to feature me in the Micheals Maker Spotlight I thought this was the perfect time to challenge myself!

The key to iron-on success is using the Cricut EasyPress and the Cricut EasyPress Heat Guide. The EasyPress 2 is my go-to heat press because of it’s consistent, even heat plate, the ability to heat to 400 degrees and a built-in timer. Along with my EasyPress 2 I also used my Cricut Maker to cut all the elements for this projects.
To get started, I headed to Michaels to show the following supplies: (I will hyperlink them)
- Canvas Panels (4) (8x8)
- Cricut Genuine Leather (2 sheets)
- Cricut Metallic Leather (2 sheets)
- Cricut Foil Iron-On
- Fabric Glue
- Craft Smart Acrylic Paint in Dark Blue
Did you know that you can now order everything online and pick it up in the store! It is so easy and saves this busy mom so much time!
I already have the EasyPress 2, EasyPress Mat and the Cricut Maker but I wanted to share the links in case you are in the market for one!
First, I opened Cricut Design Space to start creating my design. I love that design space has thousands of pre-designed projects and images. I found a pumpkin image, a small pumpkin decorative foliage image and I created my own sayings using Cricut fonts.


For the pumpkin design, I hid the leaves so I just had an outline of the pumpkin and stem. I added an 8-inch x 8 inch square around the image. I cut the image on the metallic and genuine leather. The Maker will prompt you to switch to the deep cut blade if it is not already in the machine. It will also prompt you to move the star loops to the right. Those are the white track rings around the feed bar. You can manually slide those to the right and move them back into place after you are done cutting.
Pro-tip: Place the leather face down so it does not leave residue on the cutting mat. Keep the pumpkin and the outline.
Next, unhide the stem and leaves and hid the pumpkin and square. I also designed the phrases on the same canvas since I was cutting everything on the same foil. I arranged everything on the mat to leave space to cut the pumpkin foliage. Always remember to mirror your iron-on images prior to cutting.
Once the cut was done. I opened a new canvas and add the Fall Apron project. I hid everything except the foliage. I arranged them on the mat to cut in the space I had available on my sheet from the prior cut. Don’t forget to mirror the image.
Once the foil is cut, carefully use a weeding tool to weed the excess vinyl. Weed carefully because the foil is extra delicate.

Next, I painted the top and sides of two of my canvas dark blue. I only painted the sides on the other two canvases. Make sure the canvases completely dry before moving on the next step!
When the canvases are dry pre-heat the EasyPress 2. Per the EasyPress Heat Guide, I set the temperate on the EasyPress 2 to 255 degrees and the timer to 30 seconds. This setting and directions worked perfectly when pressing the foil onto the leather. I pressed the foil sayings onto each pumpkin.


Next, I pressed the pumpkin stem and leaves onto the stretched canvas. Since there was no stretched canvas material setting on the EasyPress guide I set the material to cotton canvas. The guide suggested 290 degrees for 30 seconds which worked perfectly.


Once the design was cool I used fabric glue to glue the pumpkins to the canvas lining up the stems with the foil ironed on to the canvas. Repeat this step for the second saying and pumpkin. Remember it is a cold peal so make sure to let the design completely cool.

Next cut an 8-inch x 8-inch square out of the metallic and the genuine leather. I laid the negative space pumpkin design on top of the square and determined where I wanted the pumpkin foliage. I removed the top layer and iron-on the design. Once cool I peeled the cover off and glued the top layer back on making sure it was perfectly lined up. I then glued the design to the canvas that had the sides painted blue. Repeat for the remaining design.


I absolutely loved challenging myself to try a new iron-on project. I think they turned out great!

You can display them as a group or individually! Hang them on the wall or display on a sofa table or shelf!

Are you making a fun project for Autumn or Halloween? Make sure to use #makeitwithmichaels and tag me @craftboxgirls so I can check out your creative project!
Happy Crafting!
Xoxo LL


