It’s almost Easter and there’s nothing more exciting than decorating eggs with loved ones! There’s so much inspiration out there but I have some new products that will make your shabby chic easter egg dreams come true!

What You’ll Need:
- FolkArt Pickling Wash - Sea Glass and Gypsy Rose
- FolkArt Brushed Metal Paint - Antique Gold and Rose Gold
- Piece of Lace
- 3/4’ Flat Brush
- Stencil Tape
- Paper Plate
- Paper Towels
Step 1: Sand your eggs with a piece of light grit sandpaper so the egg is totally smooth to the touch.
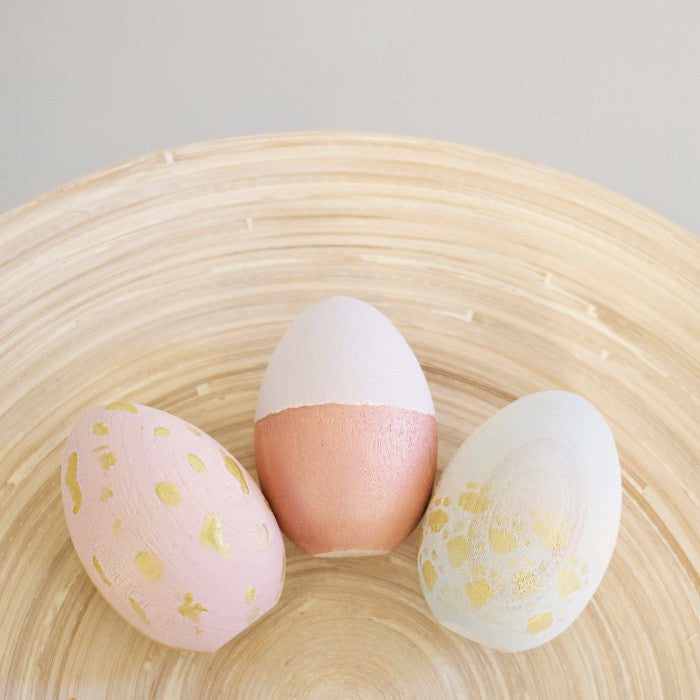
Step 2: Basecoat one egg using a flat brush with sea glass and the other gypsy rose. Immediately after applying the wash, wipe off excess with a spare cloth or paper towel. Let dry.

Step 3: Since I had three eggs and only two pickling wash colors, I decided to mix the two to create a purple/gray color. Add equal parts sea glass and gypsy rose, then mix to create your new color. I decided I waned to color block this one so I taped off a portion for the wash to create a straight line. Apply the wash to the third egg and then immediately wipe away any excess. Remove tape and let dry.

Step 4: Next, apply rose gold brush metallic paint to the portion of the purple/gray egg that hasn’t been painted to complete the color block effect. TIP: You can also leave the wood exposed if you prefer. Let dry.
Step 5: Take the gypsy rose egg and splatter the brushed metal paint in gold onto the surface for a speckled effect. TIP: You can do with this with a regular paint brush, stencil brush or even an old tooth brush! Let dry.
Step 6: Lastly, take the sea glass egg, secure the lace with stencil tape around the bottom portion. Apply paint in brushed metallic gold through the lace to create transfer the design to the egg. Remove the lace and let dry.

Now you have a three gorgeous wooden eggs that will compliment any home decor for Easter! I just love how the pickling allows the wood grain to show through and the brushed metallic paint gives it just the right pop of shimmer :-)


I hope you enjoyed learning about how apply picking wash and accent eggs with brushed metallic paint! Feel free to share with a friend who needs a little shabby chic home decor project this Easter!
Want more inspiration that speaks to you? Visit my personal blog at www.madesoulful.com and follow me on my social channels @madesoulful!
Much love,
Anna