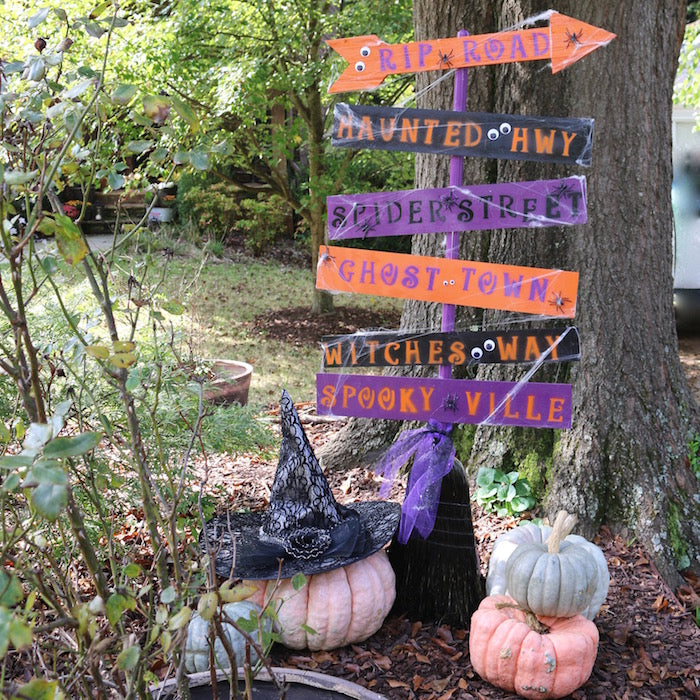
Halloween is almost here and I am excited to turn my house into a spooky wonderland. You already know we love Krylon®Brand and we love collaborating with them on festive and creative projects. If you didn't get a chance to check out last year's DIY Halloween Graveyard collaboration with Krylon you absolutely need to check out this spooktacular project! My latest collaboration with Krylon is a DIY Witches Broom Yard Sign that is sure to give your neighbors yard envy!
Materials:
- 1 Can of Krylon ColorMaster® Paint + Primer in Gloss Rich Plum
- 1 Can of Krylon ColorMaster® Paint + Primer in Gloss Pumpkin Orange
- 1 Can of Krylon ColorMaster® Paint + Primer in Gloss Black
- Broom with a Wooden Handle
- Assorted Wood Planks
- Yard Stake
- Alphabet Stencils
- Painters Tape
- Wood Glue or Super Glue
- Tarp or Drop Cloth
- Zip Ties
- Assorted Spooky Decorations (tulle, googley eyes, fake spiders, etc)
- Gloves/Mask


Project Time: 2 Hours
Directions:
- In a well-ventilated space or outdoors cover a flat surface with a drop cloth or tarp.
- Before starting, read and follow safety and application instructions on the spray paint can.
- Lay broom flat on the tarp. Tape off the handle and cover the bristles with a plastic bag.
- Hold spray paint can about 8 inches from the project and spray the broom handle in large sweeping motions with the Krylon ColorMaster Paint + Primer in Gloss Rich Plum. Apply additional coats as needed when dry to the touch. Once dry flip the broom over and spray the back of the handle.
- Lay the planks in three groups, one for each color. Spray each group with the selected color, Krylon ColorMaster Paint + Primer in Gloss Rich Plum, Gloss Pumpkin Orange or Gloss Black. Apply a second coat if needed. I only needed one coat!


- Lay the yard stake on the tarp and spray with the Krylon ColorMaster Paint + Primer in Gloss Rich Plum.
- Once the broom handle is dry remove the plastic bag and spray the bristles with a light coat of Krylon ColorMaster Paint + Primer in Gloss Black to add an extra spooky look.

- While the planks are drying decide what you want each plank to say. I went with scary places. Lay out the stencils to spell out each word. Use the painter's tape to adhere the letters together.
- Once the planks are dry, position the stencils on the plank. Cover the remaining spaces with painter's tape to avoid overspray.

- Position the can about 8 inches directly above the stencil. Start spraying a few inches off the plank and use smooth sweeping motions to spray directly above the stencil. Do not spray at an angle or paint might get under the stencil.
- Remove stencils right after you spray them. Do not let the stencil dry on the plank.
- Once all pieces of the project are dry, Position the planks how you would like them to appear on the broom handle.
- Attach with wood glue or super glue. Allow the project to dry according to glue package. I used wood glue and let it dry overnight.
- Add spooky decorations to the planks like googley eyes, fake spiders and skeleton (optional).
- When you are ready to display, drive the yard stake into the ground with a hammer.

- Attach the broom to the yard stake using zip ties. If you need a little extra support, use a brick or rock for support behind the yard stake.
- Add tulle around the base of the broom handle to cover the zip ties.


Boo! I hope you enjoy this festive project! I love the display I created in my yard! My neighbors are already asking for the how-to!


Visit your local Ace Hardware to purchase the Krylon products featured in this project as well as much more!
Connect with Krylon®: Website | Facebook | Twitter | Instagram | Pinterest | #KrylonCreated
This post is sponsored by Krylon and is part of an on-going paid campaign between Craft Box Girls and Krylon. All ideas, opinions, and photographs are my own!
xoxo- LL
