We are in the midst of Hanukkah, Christmas is next week and New Years will be here before you know it. This leaves lots of time at home with the kiddos and I know my daughter needs alot of activities to keep her busy! I have been whipping up kids crafts right and left to keep her busy. On my last Crayola Facebook live broadcast of the year I shared 3 easy crafts for kids of all ages. These are sure to entertain them and challenge their creativity.

You can shop all the supplies I used for these projects at Crayola.com
Project 1: 3D Snowman Card

Materials:
- Crayola Construction Paper
- Crayola Markers
- Crayola Glue
- Snowman Template
- 3 Mini Pom Poms
Directions:
- Download and cut out the snowman template. You will need to trace and cut 3 of the snowman on white construction paper. Cut the stick arms on brown construction paper and the carrot nose on orange construction paper.
- Fold a piece of blue construction paper in half.
- Trace around the snowman but instead of going all the way around stop at the fold. Cut out. This will give you the base of the folded card.
- Fold each of the 3 snowmen in half.
- Place a line of glue down the back center of one of the snowman and glue it to the blue card.
- Next place a line of glue down the center of the fold of the snowman from step 5. Glue the second snowman on top and repeat with the third. When you are done and glue is dry, fluff out the sides to create the 3D layered snowman.
- Next glue the stick arms and the carrot nose on the snowman.
- Glue the 3 pom poms down the center of the center of the snowman.
- Use a black marker to draw the eyes and coal mouth.
All that is left is to write a special message inside. Parent's this is a fun card to make for your younger kids. I made this one to include with my daughters Christmas gifts!

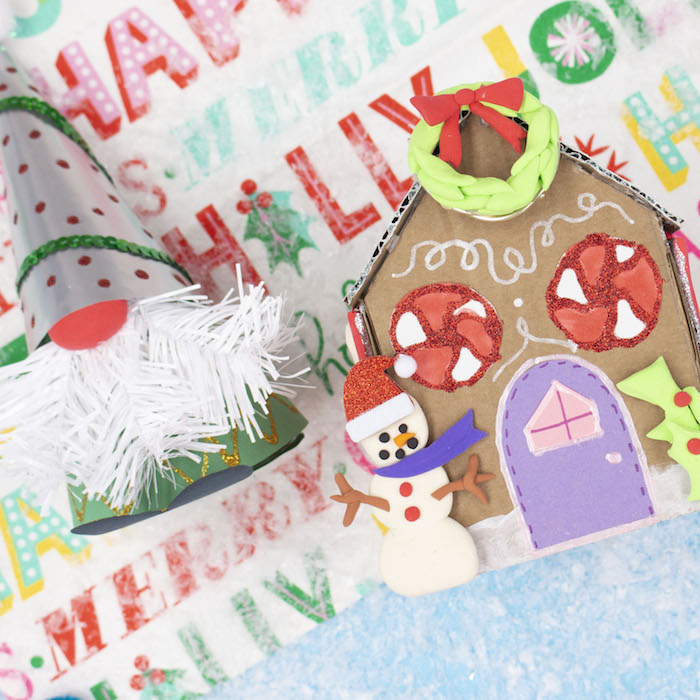
Project 2: Cardboard Gingerbread House

This is such a fun craft! Parent's you might want to build the cardboard house and then let your kids decorate!
Materials:
- Crayola White Washable or Acrylic Paint
- Crayola Washable Liquid Glue
- Crayola Model Magic
- Crayola Glitter Pens
- Crayola Construction Paper
- Cardboard
- Pencil
- Scissors
- Paint Brush
- Hot Glue
- Fine Glitter
Directions:
- Measure and cut the following out of cardboard (can be scrap cardboard)
- (2) 5.5"x4" pieces
- (1) 4"x4" piece
- (1) House Shape: width is 4", height of the walls are 4", and the peak of the roof is 6.5"
- (1) 6"x5.5" piece (this is the roof and it will be folded in half)
- Cut 4 strips of white construction paper that are 2"x4" and 2 strips that are 2"x5.5".
- Fold each one of the pieces of paper from step 2 in half.
- Using the hot glue gun, and the folded white pieces of paper as the connectors to glue the side walls of the house together.
- Paint the roof pieces white and let it dry. Slightly fold it in half and glue to the sides using the connector pieces of construction paper.
- Paint liquid glue over the paint on the roof and sprinkle glitter.
- Use model magic to to decorate the sides of the house, make a wreath for the peak of the house.
- Have fun decorating the front with construction paper, glitter glue, glitter pens, and markers.
- Use the model magic to make a snowman and a holly bush. Glue them to the front of the house.
This is such a fun project for the whole family. And because it is made out of cardboard it will last forever!


Project 3: Gnome Treat Cup

Materials:
- Plastic or Paper Cup
- Crayola Construction Paper
- Crayola Glitter Glue
- Crayola Glue
- Crayola Model Magic
- Gnome Cone Hat Template
- Treats
- Scrap Tree Garland
- Sequin Strand or Ribbon (optional)
- Craft Knife
- Pom Pom
Directions:
- Cut a piece of construction paper to fit around the cup. Glue around the cup.
- Trace the bottom of the cup on construction paper and cut out.
- Cut feet for the gnome on black construction paper. Glue the feet to the circle.
- Use the craft knife to make a cross in the center of the circle from step 2.
- Glue the circle to the opening of the cup. For this project the cup will be upside down.
- Download the template for the Cone Template, cut and trace on construction paper. I used metallic silver from the Crayola Sweatheart Construction Paper Pack. Depending on the size of your cup you might need to adjust the size of the cone. I recommend cutting on scrap paper to figure out the right size. The cone opening should be large enough to fit over the bottom of the cup with a nose and beard. Once ready roll and glue the cone.
- Glue the pieces of tree garland to the top of the cup.
- Roll a 1" ball of red model magic. Smoosh it to form an oval nose. Glue the nose over the tree branches.
- Glue the cone over the bottom (top of the gnomes head, beard and nose).
- Decorate the cone with ribbon and glitter glue. Glue a pom pom to the tip.
- Decorate the body of the gnomes with glitter glue and let it dry.
- Fill the cup through the slits in the bottom of the cup with treats or stickers!
The kiddos can make this fun crafts and parents you can surprise them with treats inside!

This was my last live facebook broadcast of the year for Crayola. I will be taking off January for maternity leave but I will be back in February!
Happy Holidays!
xoxo- LL