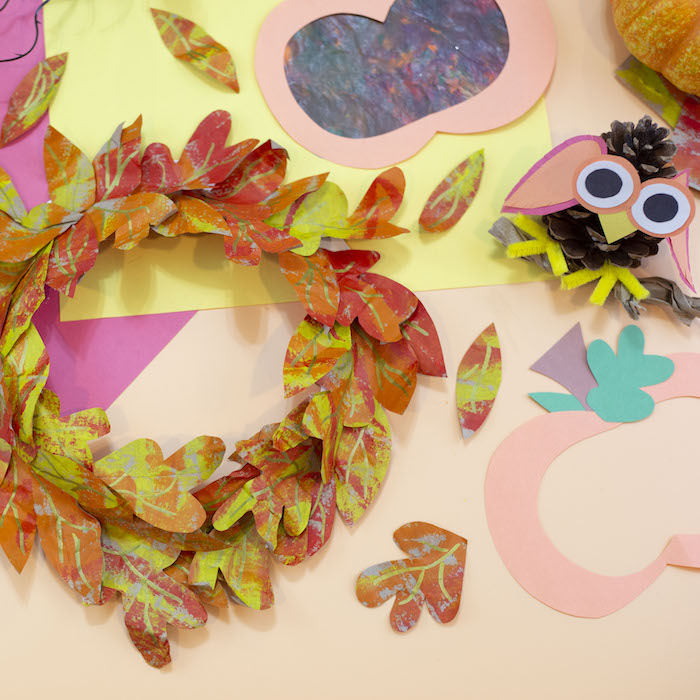
It is Fall Y'all... as we say here in the South. It is finally starting to feel like fall in Atlanta. Now that Halloween is over it is time get out all the fall feels and get ready for Thanksgiving. Our family is getting in the spirit of the season with lots of Fall fun activities and crafts. Last weekend we spent the day in the North Georgia mountains admiring all the colorful leaves which inspired the paper bag leaf wreath I am featuring this week. This week on my weekly Crayola live broadcast I am sharing 3 easy fall crafts you can do with your kiddos to get in the mood for Fall.
Shop all the materials I used in these projects at Crayola.com
Project 1: Paper Bag Fall Wreath

Materials:
- Brown Paper Lunch Bags
- Paper Plate
- Crayola Quick Dry Paint Sticks
- Crayola Metallic Markers
- Crayola Glue
- Scissors
Directions:
- Using the Quick Dry Paint Sticks to color both sides of 5 paper bags. I select red, yellow and orange but you can pick your favorite colors. You can also pick up the colors.
- Once the bags are dry cut leaf shapes from the bags. They will dry in under 5 minutes.
- Crumble the leaves to give them texture. Slightly unfold them.
- Use the gold metallic marker to draw leaf veins.
- Cut the center of the paper plate out.
- Glue the leaves on the edges of the paper plate until it is fully covered.
This is a fun craft for all ages. The kids can make it on a paper plate and parents you could make a large one on a wreath form.

Project 2: Pinecone Critters
These are so fun! Have your kids go on a nature hunt with you to find pinecones and then turn it into an activity of crafting a critter.

Materials:
- Pinecones
- Crayola Construction Paper
- Crayola Construction Paper
- Crayola Glue
- Paper Bag Scraps
- Scissors
- Googley Eyes (scarecrow)
- Yellow Pipe Cleaners (owl)
Owl Pinecone Critter Directions:
- Cut 3 different circles out of construction. You will need two sets of each. I used orange, white and black. These will be the eyes. I suggest making the black the smallest. Glue all three layers together.
- Cut a beak out of yellow construction paper.
- Glue the eyes and the beak to the pine cone.
- Cut wings out of construction and glue to the sides of the owl.
- Cut 4 pieces of pipe cleaner and twist two pieces together to create two owl claws. Glue them to the bottom of pinecone.
- Take a scrap of a paper bag and twist it into a branch. Glue to the bottom of the pinecone.

Scarecrow Critter Directions:
- Cut and glue together the pieces for a brown hat.
- Cut thin strips of yellow paper and cut into small pieces. Glue on the inside of the hat as the straw coming out from under the hat.
- Cut and make a flower for the hat. Glue to the hat.
- Glue the hat to the top of the pinecone.
- Glue googley eyes to the front of the pinecone.
- Cut an orange triangle for the scarecrow nose and glue between the eyes.
- Cut a squiggly mouth and glue to the pine cone.

These pine cone critters would be the perfect decoration for the kids table on Thanksgiving.

Project 3: Crayon Shavings Pumpkin

Materials:
- Crayola Crayons
- Crayon Sharpener
- Crayola Construction Paper
- Wax Paper
- Blow Dryer or Iron
- Scissor
- Crayola Glue
Directions:
- Use new or broken crayons. Use a crayon or pencil sharpener to get a variety of crayon shavings.
- Cut a pumpkin, stem and vines out of construction paper.
- Cut the center out of the pumpkin leaving a border.
- Lay the crayon shavings on a piece of wax paper. Cover it with a second sheet of wax paper.
- Use a blow dryer on high heat or an iron to melt the crayon shavings. This step should be done by an adult.
- Let it cool.
- Trim the wax paper to fit in the pumpkin opening. Glue to the back of the pumpkin.
- Glue the stem and vines to the top of the pumpkin.
Hold it up to the window and watch the light shine through!
Happy Fall Crafting!
Stay tuned for easy crafts for the kids every Tuesday at 1:00pm EST on the Crayola Facebook Page!
xoxo- LL


