Get ready to soar up in the clouds and fly a kite as an artist! Grab your favorite colors of paper and let’s get started! Here’s what you’ll need to make this craft:
Project Difficulty: Beginner/Intermediate
Materials:
- Bright Pop! Cardstock Pad
- 2 sheets of Construction paper
- Glue Stick
- Liquid Glue
- Erasable Colored Pencil
- Creativity Canvas
- Watercolors Palette from Paint Set
- Paintbrush
Additional Materials:
- Cup with Water
- Scissors
- Cotton Balls
- Yarn
- Kite Template
- Ruler
- Pipe Cleaners

Directions:
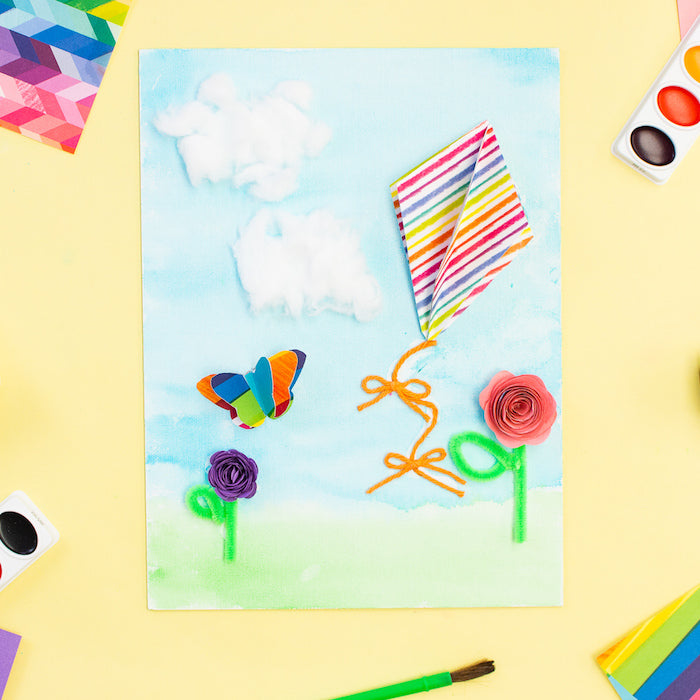
- Cover your workspace so your surface doesn’t get messy.
- Paint all of your canvas with blue watercolor to make your sky except for a small section at the end.

- Paint section you left unpainted green to create grass. Set aside to dry.

- Cut out your kite template.

- Trace the template on the white side of the Bright Pop! Cardstock paper with your Erasable Colored Pencil four times.
- Cut out the kites you just traced.

- Fold each kite in half hot dog style or vertically.

- With your glue stick, add glue to one side of a kite and add another kite to the glue side. Repeat this step with all the folded kites. Once complete, you have your 3D kite.


- Add your liquid glue to the white side of the 3D kite and glue it to your canvas. Hold in place for a few seconds.


- Add a thin line of glue in a snake-like shape to the bottom of your kite. Place the yarn to the top of the glue. Cut off any excess yarn.


- With the extra yarn, tie a simple bow, cut, and add it to the string you just glued. Repeat this step one more time.

- Wipe off any excess glue, if needed.
- Take your cotton balls and separate/loosen each one to make clouds. Add glue to your canvas and place the cotton balls on top.

- Cut out your butterfly template and trace it onto the white side of another pattern of your cardstock paper. Trace the butterfly 4 times.

- Cut each butterfly and fold each butterfly in half.

- With your glue stick, add glue to one side of a butterfly and add another butterfly to the glue side. Repeat this step with all the folded butterflies. Once complete, you have your 3D butterfly.


- Add liquid glue to your canvas and place the butterfly on top. Hold it in place for a few seconds and let it dry completely.

- Cut the flower template out and trace it onto a piece of construction paper. Or freehand cut or draw the flower template.


- Cut out the construction paper flower.


- Roll the flower in between your fingers from one end to the other. Add glue once you reach the end to hold it together. Hold it in place to let it dry. Repeat this step to make another flower.

- Add two small amounts of glue to your canvas and add your flowers.

- Cut the pipe cleaners to fit as stems for the flowers. Shape extra pieces into an oval loop to make leaves for your flowers.

- Add glue to the canvas and add the pipe cleaners on top.

We hope you enjoyed this Camp Craft Box project! Parents, share your child’s craft on the Camp Craft Box Facebook Group. Don’t forget to tag @crayola and @craftboxgirls and use the hashtag #CampCraftBox if you share your child's projects on social media.