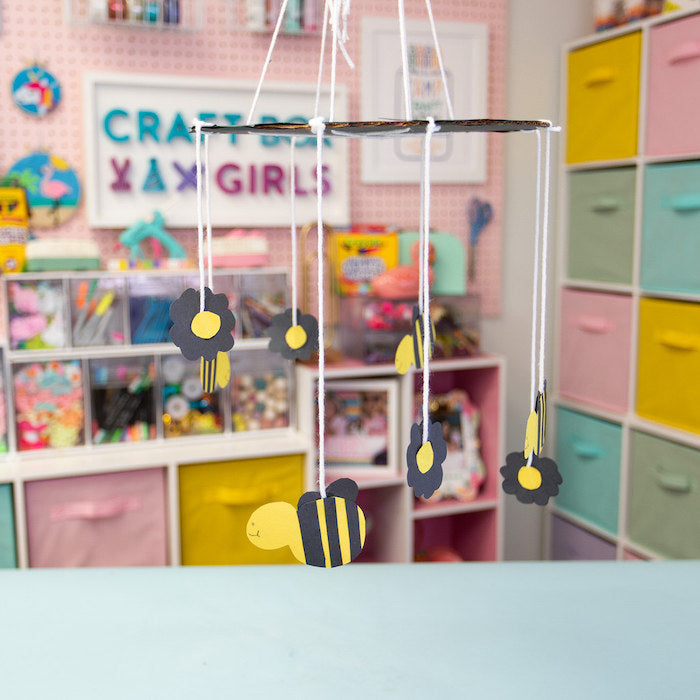
Keep yourself “Bizzzy” with this fun project and create a bumble bee mobile that you can hang over your bed or decorate your room with! This is what you’ll need to make this craft:
Project Difficulty: Advanced
Materials:
- Medium size piece of a cardboard box
- Black Construction Paper
- Yellow Construction Paper
- Erasable Color Pencil
- Glue Stick
- Liquid Glue
Additional Materials:
- Sharpened Pencil
- Medium Size Bowl
- Scissors
- Yarn

Directions:
- Flip a medium size bowl upside down on top of a piece of cardboard, then trace out a circle using an erasable pencil. Once you’ve traced it, cut the circle out. If the cardboard is really thick or hard to cut, ask an adult for help.

- Fully cover one side of your cardboard circle in glue using a washable glue stick.

- Lay one piece of black construction paper directly on top of the glue and in the middle of your cutout circle. Use scissors to cut the excess paper around the circle's edges, then set your scrap paper to the side.

- Add extra glue to the sides of your circle cutout where there is no construction paper, then lay your black scrap paper on top. You may need to cut your scrap paper in multiple pieces in order to get them to fit on your circle.
- Once your circle cutout is fully covered in black construction paper, use scissors to cut the excess paper around the circle’s edges.

- Repeat steps 2, 3, 4 and 5 to cover the other side of your cardboard circle.
- Now it’s time to create the bumble bees! Start by folding a yellow piece of construction paper in half hamburger style.
- Once your yellow paper is folded, use a pencil to draw the shape of a bumble bee’s body right in the middle of it. If you need a little help with getting the drawing right, try making a shape that resembles the number eight without the crossing line in the middle. Cut out your bumble bee shapes, if your yellow paper is folded in half twice you should end up with four. When you're done, set your yellow scrap paper to the side for a later step.

- It’s time to make the wings! Start by folding your black construction paper in half twice, hamburger style.

- Use an erasable color pencil to draw the shapes of two “U”’s at the fold of your construction paper.
- Use scissors to cut out the U’s. If your paper is folded in half twice you should end up with four sets of wings. Hang onto your black scrap paper for the next step.

- Keep the black scrap paper folded in half. Create stripes for your bumblebee’s body by cutting strips at the unfolded/open end of your folded paper. Since your paper is folded, you’ll end up with two stripes combined for each one cut that you make. You can cut out as many as you’d, but if you’d like to cover your bees with at least three stripes on each side, you’ll need to cut out at least 24 stripes.

- Once you’ve cut your stripes, lay them on all of your bee’s body to measure out how long they should be. If there is excess paper around the edges, use scissors to cut them to size.

- Use a washable glue stick to glue the stripes on both sides of the bumblebee.

- Use an erasable pencil to draw faces on both sides of all your bumblebees.

- Twist and fold all of your wings into half heart shapes.

-
Place a small dot of glue on the back of your wings. Lay a piece of yarn at the top center of your bee, then place the wings with glue directly on top of it. Your glued wings should hold the yard in place and attach it to the bee’s body. Repeat steps 17 and 18 for all of your bumble bees.

- Next it’s time to make the flowers! Grab your scrap yellow paper and make sure that it is still folded in half twice. Place a washable glue stick on top of it and use an erasable pencil to trace out small circles around the top of the glue stick.

- Cut out the traced circles. If your paper was folded in half twice, you should have ended up with four cutouts.

- Place a yellow circle on top of your folded black scrap paper, then use an erasable pencil to draw the shape of a flower around it.

- Cut out the flower shapes. If your paper was folded in half twice you should have ended up with four.

- Place a dot of glue in the middle of your flower cut outs and in the middle of your yellow circles.

- Once you’re done, place a piece of yarn directly in between each flower shape and yellow circle. Repeat this step for all of your flowers.

- Grab your cardboard circle and use a sharpened #2 pencil to safely punch eight even holes along the outer rim of it. If punching the holes is not so easy, ask an adult for help.

- Use the sharpened #2 pencil again to punch six holes along the inner rim of the cardboard circle. The inner rim should be about half an inch away from the outer rim.

- Thread your stringed flowers and bumblebees through the punched holes on the outer rim of your circle. Use the same sharpened pencil to help push them through, if needed.

- Once you’ve threaded your strings, adjust them to the height that you’d like each bee or flower to be at. Tie the strings in knots at the top of the cardboard circle to keep them in place. Cut any excess string.

- Cut three pieces of yarn that are double the length of your arm.

- Thread one end of the yarn through the top of your cardboard circle, then flip the circle over and finish threading it through the hole that is diagonally across. When you're done, both ends should come through to the top of your mobile.

- Repeat step 29 for the remaining four holes.

- Once you’ve threaded all of your string, make sure they are all at even lengths, then tie them together in a knot and done!

Ask an adult to help you hang your mobile in your bedroom or playroom so you watch the bumblebees and flowers spin around!
We hope you enjoyed this Camp Craft Box project! Parents, share your child’s craft on the Camp Craft Box Facebook Group. Don’t forget to tag @crayola and @craftboxgirls and use the hashtag #CampCraftBox if you share your child's projects on social media.