When it comes time for the holidays, I like to get myself and any events organized. (That is why I am The Organized Mama!!) I always start with planning out any events that we may have. This year, we are hosting a Hanukkah party, so I wanted to create an easy, no-sew Hanukkah table runner. This table runner is perfect for any event, but with the colors I went with, it is perfect for an upscale Hanukkah party!
Materials
- Blue Plaid Fabric
- White Plaid Fabric
- Fabric Scissors
- 5” Burlap Roll
- Gold Sharpie Pen
- Black Cardstock
- Blue Cardstock
- Dreidel Die Cut or Paper Cutting Machine
- Xyron Adhesive Runner

Tutorial
These table runners are to also be used as placemats! They will lay over your table width wise, not like a traditional table runner that runs the length.
Step One:
Measure the width of the table. Add on 10” to that number, as you will want the runners to hang over the table.
Step Two:
Find plaid fabric at your local fabric store. Make sure you get blue plaid and white plaid.

Step Three:
Lay your fabric out on the table. Using your fabric scissors, cut the fabric roughly 10-15” in width. This will depend on the length of the table and how closely you will be putting each chair. Go for a smaller width if you have chairs close together, and wider if your chairs are further apart.
Step Four:
Repeat for all the fabric.

Step Five:
Roll the burlap over the fabric, and cut to match. Repeat for all the table runners. Make sure you smooth out the burlap and fabric to mesh together.
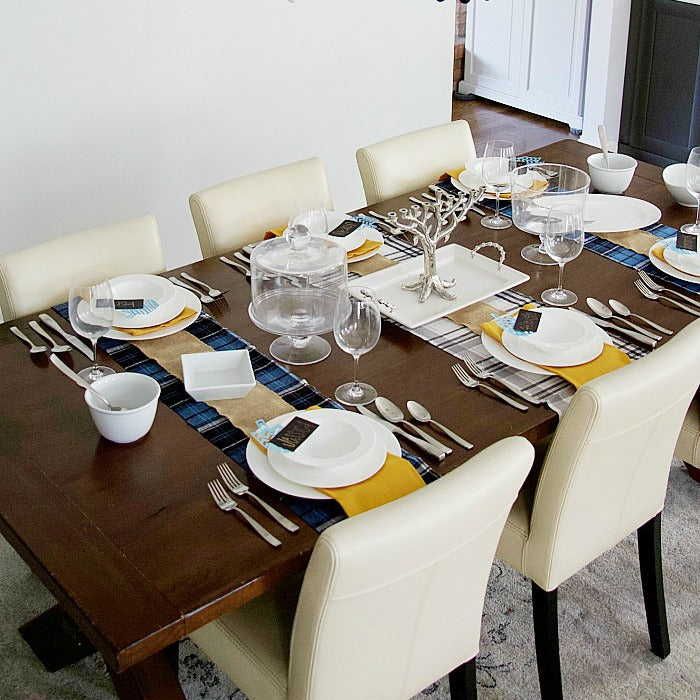
Step Six:
Set the table with plates, bowls, glasses, silverware, and napkins. I went with yellow as it brings a nice pop of color to the blues and blacks on the table.
Step Seven:
I like to add height to the table by using cake stands and other taller serving platters. Add the cake stands to the ends of the table.
Add a tray and the menorah to the middle of the table. The tray can double as a drip tray when the candles are burning.
Fill the remainder of the table with bowls and dishes to use as serving pieces.
And don’t forget to add wall décor! Hanukkah banners and decorative felt balls on string are perfect.

Step Eight:
Cut out 4” by 2” rectangles from the black cardstock. Write everyone’s name on the cardstock using the gold Sharpie marker.
Step Nine:
Using your die cut or paper cutter, cut out a dreidel on the blue cardstock.
Step Ten:
Attach each dreidel cut out to the black cardstock using tape. I used my Xyron adhesive runner.
Step Eleven:
Put place cards at each individuals spot at the table.

The statement the no-sew Hanukkah table runners make when you sit down for your meal is just perfect! It is simple, yet elegant and different. Plus they are super easy to throw together, which everyone needs things easy this time of year!


For more ways to organize yourself for the holiday season, head over to The Organized Mama!!